One of the coolest thing about Zephyr is the ability to write an application and then use it across many platforms and architectures. For companies and individuals who prefer to stay vendor agnostic as much as possible Zephyr, as an RTOS, is a great tool.
In this post i’ll be going over some of the library code that I wrote for the new Air Quality Wing.
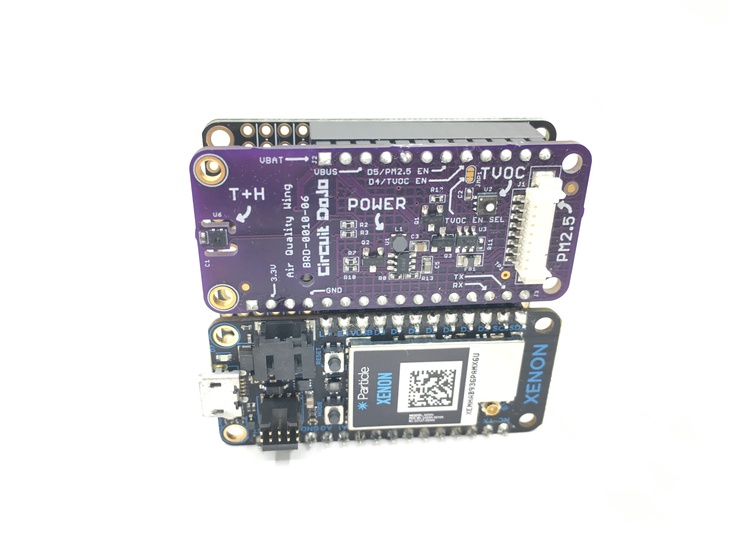
For the uninitiated, the Air Quality Wing is a board that I developed a few years ago (boy does time fly) to help keep tabs on the air quality inside in my apartment. It’s since been adopted by many all over the world for air quality monitoring projects in airports, apartments and industrial sites.
Let’s jump in and talk about some of the highlights.

Zephyr Advantages
For the uninitiated, Zephyr allows you to write platform/silicon agnostic code which you can use without having to do major re-writes every 2 years. In my case, I was able to develop the bulk of my code on one platform and then add other boards into the mix with minimal edits/changes.
For instance, the bulk of the library lives in this repository. It includes all the abstractions from the lower level driver access and device driver DTS bindings. If you’re new to the concept of developing drivers on Zephyr, make sure you check out my post on the Interrupt blog here.
If you look carefully, the drivers repo does not refer to any specific board. (no boards directory or .overlay files)
❯ tree -L 1
.
├── CMakeLists.txt
├── Kconfig
├── README.md
├── build
├── drivers
├── dts
├── ext
├── include
├── lib
├── west.yml
└── zephyr
All of that fun happens within the demo code itself:
❯ tree -L 2
.
├── CMakeLists.txt
├── Kconfig
├── boards
│   ├── circuitdojo_feather_nrf9160ns.conf
│   ├── circuitdojo_feather_nrf9160ns.overlay
│   ├── nrf52840dk_nrf52840.conf
│   ├── nrf52840dk_nrf52840.overlay
│   ├── particle_xenon.conf
│   └── particle_xenon.overlay
├── build
├── mcuboot
├── prj.conf
└── src
You can see that the boards directory has some board specific configurations and overlays.
You may be asking, why the need for any of these configurations/overlays?
To define each board’s console output and pin mappings.
For instance, the .overlay files are used to map which pins go to the I2C bus and UART:
 &i2c1 {
    sgp40@59 {
        compatible = "sensirion,sgp40";
        reg = <0x59>;
        label = "SGP40";
        enable-gpios = <&gpio0 0 GPIO_ACTIVE_HIGH>;
    };

	shtc3@70 {
		compatible = "sensirion,shtc3";
		reg = <0x70>;
		label = "SHTC3";
    };
};


&uart2 {
    compatible = "nordic,nrf-uarte";
    current-speed = <9600>;
    tx-pin = <24>;
	rx-pin = <23>;
    status = "okay";

    hpma115s0 {
        compatible = "honeywell,hpma115s0";
        label = "HPMA115S0";
        enable-gpios = <&gpio0 1 GPIO_ACTIVE_HIGH>;
    };
};
(The above is the pin mapping for the nRF9160 Feather).
Most of the boards use the UART console for debug output. I found it easier though with the Xenon to use RTT instead:
# Segger RTT
CONFIG_USE_SEGGER_RTT=y
CONFIG_RTT_CONSOLE=y
CONFIG_UART_CONSOLE=n
CONFIG_LOG_BACKEND_RTT=y
CONFIG_LOG_BACKEND_UART=n
The above turns on RTT an turns of the UART console.
The cool thing about this is that you can adapt your own board to run the Air Quality Wing demo code. Yes, you can BYOB (bring your own board). If your board is defined in Zephyr’s boards directory, it’s as simple as creating board specific .conf and .overlay files to match your configuration.
Sweet right?

The examples
In this section i’ll break down some of the differences between some of the examples and how you can use them to kick start your own endeavors.
Basic
The Basic sample is the foundation for all the other samples. It’s the minimal amount of code needed to boot and start reading data from the Air Quality Wing. Let’s see how it’s set up:
Device name definitions
One of the first things you’ll see in main.c are the definitions of each of the sensors. This is required to map your .overlay to the functionality of the library.
/* Device name defintions*/
#define SHTC3 DT_INST(0, sensirion_shtc3)
#define CONFIG_SHTC3_DEV_NAME DT_LABEL(SHTC3)

#define SGP40 DT_INST(0, sensirion_sgp40)
#define CONFIG_SGP40_DEV_NAME DT_LABEL(SGP40)

#define HPMA115S0 DT_INST(0, honeywell_hpma115s0)
#define CONFIG_HPMA115S0_DEV_NAME DT_LABEL(HPMA115S0)
The first line in each pair obtains the device that matches the specified compatible. The second line then finds the device by the provided label. Take a look at the .overlay earlier in the post. Can you match each .overlay entry to the macros above?
Creating each aqw_sensor
I tried to make the Air Quality Wing library as customizable as possible. In the next section you’ll see that the sensors are now declared as struct aqw_sensor along with some other options:
static struct aqw_sensor temperature_sensor =
    {
        .type = AQW_TEMPERATURE_SENSOR,
        .chan = SENSOR_CHAN_AMBIENT_TEMP,
        .dev_name = CONFIG_SHTC3_DEV_NAME,
        .interval = STANDARD_SENSOR_INTERVAL,
};
This allows you to set different sensor types and map them to the devices in your device tree. You can also see i’m mapping the measurement type for the specific reading that is define in sensor.h. within enum sensor_channel. Since there’s only one measurement type per channel, you can see, for instance, the SHTC3 is defined twice: once for temperature and once for humidity.
You can also configure the measurement interval per-measurement type. This may be useful if you’re interested in a particular measurement periodically. This entry is set in seconds.
Finally, toward the bottom of those declarations, you can see i’ve wrapped them up in an array as pointers:
static struct aqw_sensor *sensors[] = {
    &temperature_sensor,
    &humidity_sensor,
    &voc_sensor,
    &hpma_sensor,
};
This sensor array can be initialized with the library which makes it extremely simple to iterate and get new sensor values. Don’t want to use/initialize a particular sensor? Remove it from the array. ( Side note: I also recommend disabling the sensor in your project’s .conf file or else your driver code may still be loaded into your project! )
Getting the values back
As you’ll see in a second, initialization also requires a callback. This callback is used to get the values back from the AQW library when the measurements complete:
void sensor_cb(struct aqw_sensor_data *data, size_t len)
{
    for (int i = 0; i < len; i++)
    {

        /* Skip if not valid */
        if (data[i].type == AQW_INVALID_SENSOR)
            continue;

        LOG_INF("%s: %i.%i%s", aqw_sensor_type_to_string(data[i].type), data[i].val.val1, data[i].val.val2, aqw_sensor_unit_to_string(data[i].type));
    }
}
Due to the nature of sensors being placed in array, you’ll notice I skip any sensors that are invalid. This also goes for sensors which don’t have a value yet. This is applies particularly to the SGP40 since it takes ~1 minute to “warm-up”.
Library Init
Finally, initialization is only a few function calls:
    /* Init Air Quality Wing */
    err = aqw_init(sensors, ARRAY_SIZE(sensors), sensor_cb);
    if (err)
        __ASSERT_MSG_INFO("Unable to init Air Quality Wing library. Err: %i", err);

    err = aqw_sensor_start_fetch();
    if (err)
        __ASSERT_MSG_INFO("Unable to start fetch. Err: %i", err);
aqw_init pulls in the sensors defined at the top of the file. It also takes the callback we talked about earlier as an argument. Make sure both are define or else the library will not work!
The library will not work though until you run aqw_sensor_start_fetch. This starts the reoccurring measurement process. The library uses k_work_delayable to periodically obtain new sensor values thus the main thread is dropped and freed for use by the system work thread and others.

Bluetooth
Adding on top of what’s done in the Basic sample, the BLE (aka Bluetooth Low Energy) sample adds the capability to receive updates via Bluetooth. Most of the fun happens within ble/app_ble.c and ble/services/aqw.c. Here’s what the overall file structure looks:
❯ tree -L 3 boards config src
boards
├── nrf52840dk_nrf52840.conf
├── nrf52840dk_nrf52840.overlay
├── particle_xenon.conf
└── particle_xenon.overlay
config
└── ble.conf
src
├── ble
│   ├── CMakeLists.txt
│   ├── app_ble.c
│   ├── app_ble.h
│   └── services
│       ├── aqw.c
│       └── aqw.h
├── main.c
└── storage
    ├── CMakeLists.txt
    ├── Kconfig
    └── app_storage.c
When developing new Bluetooth applications, I typically like to separate the services into separate files. It keeps things clean. Plus, there’s no confusion about what lives where! In the case of this example, there’s only one service, the Air Quality Wing service. It’s composed of the temperature, humidity, VOC and PM2.5 characteristics. The characteristics are defined in aqw.h like so:
#define BT_UUID_AQW_VAL \
    BT_UUID_128_ENCODE(0x13370001, 0xb5a3, 0xf393, 0xe0a9, 0xe50e24dcca9e)

/* Characterisitcs for sensors */
#define BT_UUID_AQW_TEMPERATURE_VAL \
    BT_UUID_128_ENCODE(0x13370002, 0xb5a3, 0xf393, 0xe0a9, 0xe50e24dcca9e)
#define BT_UUID_AQW_HUMIDITY_VAL \
    BT_UUID_128_ENCODE(0x13370003, 0xb5a3, 0xf393, 0xe0a9, 0xe50e24dcca9e)
#define BT_UUID_AQW_VOC_VAL \
    BT_UUID_128_ENCODE(0x13370004, 0xb5a3, 0xf393, 0xe0a9, 0xe50e24dcca9e)
#define BT_UUID_AQW_PM25_VAL \
    BT_UUID_128_ENCODE(0x13370005, 0xb5a3, 0xf393, 0xe0a9, 0xe50e24dcca9e)

#define BT_UUID_AQW_SERVICE BT_UUID_DECLARE_128(BT_UUID_AQW_VAL)
#define BT_UUID_AQW_TEMPERATURE BT_UUID_DECLARE_128(BT_UUID_AQW_TEMPERATURE_VAL)
#define BT_UUID_AQW_HUMIDITY BT_UUID_DECLARE_128(BT_UUID_AQW_HUMIDITY_VAL)
#define BT_UUID_AQW_VOC BT_UUID_DECLARE_128(BT_UUID_AQW_VOC_VAL)
#define BT_UUID_AQW_PM25 BT_UUID_DECLARE_128(BT_UUID_AQW_PM25_VAL)
You can see, it starts with declaring a full 128-bit UUID for the service and characteristics. Since i’m creating a service from scratch I decided to use an arbitrary value. It’s typical to increment the characteristic UUIDs from the service one. You can see it goes from 0001 to 0002 and so on.
Defining the service and characteristics happen within src/ble/services/aqw.c. Zephyr uses the BT_GATT_SERVICE_DEFINE macro to define new Bluetooth services/characteristics. Here’s what the final one looks like:
/* Air Quality Wing Service Declaration */
BT_GATT_SERVICE_DEFINE(aqw_service,
                       BT_GATT_PRIMARY_SERVICE(BT_UUID_AQW_SERVICE),
                       BT_GATT_CHARACTERISTIC(BT_UUID_AQW_TEMPERATURE, BT_GATT_CHRC_NOTIFY,
                                              BT_GATT_PERM_NONE, NULL, NULL, NULL),
                       BT_GATT_CCC(app_ble_aqw_ccc_cfg_changed,
                                   BT_GATT_PERM_READ | BT_GATT_PERM_WRITE),
                       BT_GATT_CHARACTERISTIC(BT_UUID_AQW_HUMIDITY, BT_GATT_CHRC_NOTIFY,
                                              BT_GATT_PERM_NONE, NULL, NULL, NULL),
                       BT_GATT_CCC(app_ble_aqw_ccc_cfg_changed,
                                   BT_GATT_PERM_READ | BT_GATT_PERM_WRITE),
                       BT_GATT_CHARACTERISTIC(BT_UUID_AQW_VOC, BT_GATT_CHRC_NOTIFY,
                                              BT_GATT_PERM_NONE, NULL, NULL, NULL),
                       BT_GATT_CCC(app_ble_aqw_ccc_cfg_changed,
                                   BT_GATT_PERM_READ | BT_GATT_PERM_WRITE),
                       BT_GATT_CHARACTERISTIC(BT_UUID_AQW_PM25, BT_GATT_CHRC_NOTIFY,
                                              BT_GATT_PERM_NONE, NULL, NULL, NULL),
                       BT_GATT_CCC(app_ble_aqw_ccc_cfg_changed,
                                   BT_GATT_PERM_READ | BT_GATT_PERM_WRITE), );
BT_GATT_SERVICE_DEFINE starts with defining the servcie name. Then, it follows on with setting the service UUID (as defined earlier in the header). Then, followed by the characteristic definitions and CCC definitions if you’re using notifications. Since all of this happens pre-processor, if you run into issues the compiler will let you know. No more programming, guessing and checking like with other SDKS.
Publishing data uses the app_ble_aqw_pubish function. It’s particularly special since you can write any piece of supported sensor data and it will notify to the correct characteristic.
int app_ble_aqw_publish(struct bt_conn *conn, const struct app_ble_payload *data)
{
struct bt_gatt_notify_params params = {0};
const struct bt_gatt_attr *attr = NULL;
switch (data->type)
{
case AQW_TEMPERATURE_SENSOR:
attr = &aqw_service.attrs[AQW_TEMP_ATTR_POS];
break;
case AQW_HUMIDITY_SENSOR:
attr = &aqw_service.attrs[AQW_HUMIDITY_ATTR_POS];
break;
case AQW_VOC_SENSOR:
attr = &aqw_service.attrs[AQW_VOC_ATTR_POS];
break;
case AQW_PM25_SENSOR:
attr = &aqw_service.attrs[AQW_PM25_ATTR_POS];
break;
default:
return -EINVAL;
break;
}
params.attr = attr;
params.data = &data->value;
params.len = sizeof(data->value);
params.func = NULL;
if (!conn)
{
LOG_DBG("Notification send to all connected peers");
return bt_gatt_notify_cb(NULL, ¶ms);
}
else if (bt_gatt_is_subscribed(conn, attr, BT_GATT_CCC_NOTIFY))
{
return bt_gatt_notify_cb(conn, ¶ms);
}
else
{
return -EINVAL;
}
}
You can see, it sorts, sets the data an then notifies to connected clients. If you’re curious about the contents of struct app_ble_payload you can check out app_ble.h.
app_ble.c brings it all together with initialization in app_ble_init and app_ble_publish_sensor_data which forwards along published events to the app_ble_aqw_publish function call. While in other SDKs Bluetooth is a big to-do, Zephyr has made it quite simple to get an application Bluetooth enabled.
Now, if we run over to sensor_cb in main.c you can see I also added the app_ble_publish_sensor_data call when new sensor data is available. I hope you can visualize how the data gets propagated all the way to the underlying BLE syscalls.
void sensor_cb(struct aqw_sensor_data *data, size_t len)
{
    for (int i = 0; i < len; i++)
    {

        /* Skip if not valid */
        if (data[i].type == AQW_INVALID_SENSOR)
            continue;

        LOG_INF("%s: %i.%i%s", aqw_sensor_type_to_string(data[i].type), data[i].val.val1, data[i].val.val2, aqw_sensor_unit_to_string(data[i].type));

        /* Data */
        struct app_ble_payload payload = {
            .value = data[i].val,
            .ts = k_uptime_ticks(),
            .type = data[i].type,
        };

        /* Attempt to publish no matter what */
        app_ble_publish_sensor_data(&payload);

        /* TODO: storing previous values to storage? */
    }
}
Otherwise, everything else in main.c should look very familiar!
Conclusion
This is just the tip of the iceberg about how I designed the Air Quality Wing firmware. I’m hoping it’s generic enough where you can import it into your pre-existing code base and start taking air quality measurements with ease.
There are also future examples coming out including one featuring Golioth (an up and coming IoT platform i’m a big fan of). A dedicated blog post for the Golioth code is forthcoming so stay tuned! In the meantime, you can check out the work in progress code at the Air Quality Wing Demo repository.
And one more thing..
Despite all the supply chain issues we’re going through these days, assembly on a small batch of the Air Quality Wing has begun! Parts have been at the factory for about a week now and they should be completed by Mid-October or so.
If you’re interested in grabbing one, you can pre-order at my store here.
Thanks for reading. Feel free to drop me a line (hello@jaredwolff.com) if you think something is missing or if you have questions. Or, check out the community where I read (and, almost, answer to) every question.
Last Modified: 2021.10.13