Update: 4/15/2020
As of 4/15 the CCS811 is not available and potentially EOL. The remnants of CCS (Cambridge CMOS Sensors) was purchased by a holding company in Beijing. Due to this fact, I can no longer endorse or recommend the product to be used by anyone.
UPDATE! (6/18/2019)
I’ve been watching the data over the past month. What i’ve found has definitely changed my opinion about the devices i’m using.
So what’s the big news?
Temperature
The BME680 and the SGP30 both correlate in their readings with temperature. This means when the temperature goes up and down, i’ve seen the TVOC reading go up and down as well. Hardly useful for a sensor that is supposed to tell you if your air is bad or not.
Take a look at the screenshot below:
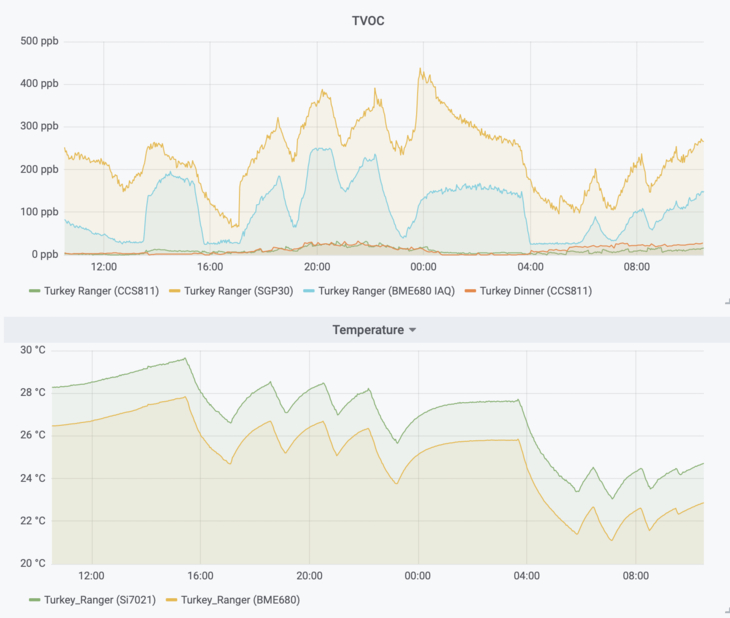
You can see that both sensors react wildly to temperature. Whereas the CCS811 has a bump but not significantly. If I go by the scales in the data sheets for the BME680 and SGP30, the room that these sensors are in require immediate venting.
Even right now, the SGP30 sensor is half way to the danger zone. 😵

So what does this mean for my initial results?
I think Sensirion and Bosch have some work cut out for them to make sure these readings correlate to TVOC.. not to temperature.
I’ve knocked off two stars for each of the offending sensors. I don’t think they’re ready. As for the CCS811, continue reading below for my concerns on that part.
Since releasing the Air Quality Wing, some of you have asked why use the CCS811 and Si7021?
Let me tell you, it wasn’t scientific.
Foremost, I had used these sensors on other projects. This made it super easy to integrate and start using.
But was it the right choice?
In this post, I’m going to go compare these parts using the data sheets, cost breakdown and availability. (as of May 2019) Plus I’ll run them side by side in an ultimate sensor showdown.
Let’s get started.

BME680
Features
The BME680 is a Temperature, Humidity, VOC, and Pressure sensor. It’s, by far, the most featured device that I’ve seen in one package.
You can control it via I2C or SPI. Power it down to 1.71V or up to 3.6V.
Here’s a table of the most pertinent parameters.
| Accuracy | |
|---|---|
| Indoor Air Quality | ?? |
| Humidity (%) | ±3 |
| Pressure (kPa) | ±0.12 |
| Temperature (°C) | ±1.0 |
In comparison with the other VOC sensors, it does not calculate the C02 or VOCs. Rather, it uses the gas sensor readings to calculate the IAQ (Indoor Air Quality).

This scale is from the German Federal Environmental Agency’s guidelines on VOCs. (According to the BME680 data sheet)
The gas sensor measurements, worst case, draw 18 mA from your power supply. All the other measurements are < 1mA. Not bad.
Cost/Availably
The BME680’s price is reasonable despite the features packed inside. In most cases, it will beat any combination of sensors in price. It sure did for the CCS811/Si7021 combination in the Air Quality Wing.

The BME680 is available at most distributors. This is a plus especially when you need parts and you need them now!
Integration
The BME680 is simple to integrate. My biggest gripe is the addition of a library used to calculate the IAQ. This library is also used to calculate the compensated humidity and temperature readings. I understand the necessity of keeping their IP safe but at what cost?
This is also troublesome to integrate using the particle SDK. It was not impossible but cloud updates from the Visual Code do not work.
Overall
Here’s the breakdown of all the pros and cons of the BME680:
Pros
- Having 4 sensors in one is a big plus. Despite the high price, it’s providing more value in comparison with the other sensors in this post.
- High availability and produced by a well known sensor company.
- Best-in-class power consumption. If you’re looking to embed a sensor into a battery powered application, this is your choice.
- Best-in-class operating voltage range (1.8-3.6V)
Cons
-
More difficult to integrate into Particle firmware. If you’re rolling your own, it’s trivial.
-
Static library does take up more memory and flash space. This could make or break your application depending on the processor.
-
Humidity and Temperature measurements appear to be less accurate. It may still require another temperature, humidity sensor. (Which defeats the purpose of an all-in-one device.) Update: since changing the device from Continuous to Low Power mode i’ve seen a significant improvement on these readings.
Here’s the before and after:
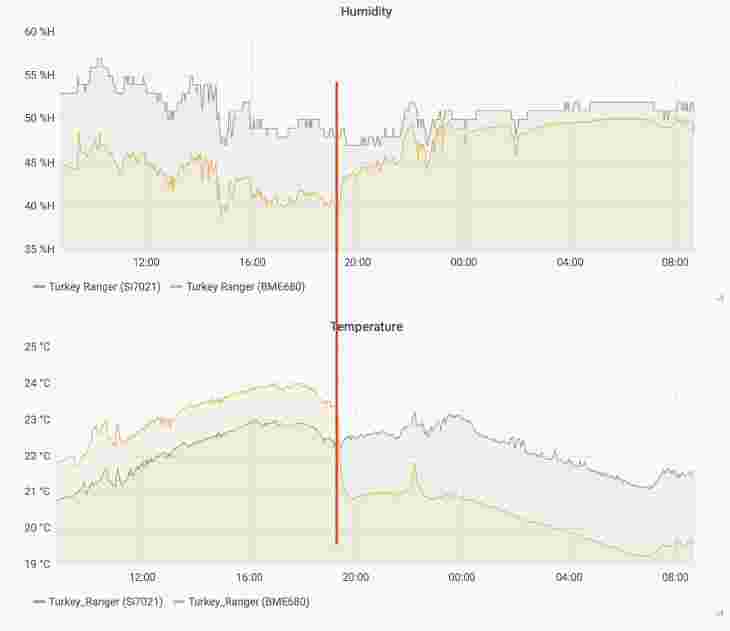
The red line represents when I changed the code.

Not sure yet
- This device is more sensitive than the CCS811. See about how it actually performed in the Testing section below.
My rating?
Drumroll please….
⭐️⭐️⭐️
CCS811
Features
This device has an onboard MCU that calculates the eC02 and VOC readings in your air. So when they’re read from the device, you have something immediately actionable.
The CCS811 can be temperature and humidity calibrated. You need to use an external sensor, like the Si7021, to get those values. (Otherwise, it uses a middle-of-the-road humidity and temperature to calculate TVOC and C02)
Another downside is there is no specification on the accuracy of the device. Are the readings a best estimate? Are they close? Are they way off?
Not too far behind the BME680, the CCS811 draws 26mA during measurement. Otherwise it’s <1 mA most of the time.
Cost/Availability
The biggest factor for choosing (or not choosing) the CCS811 is the availability.
The CCS811 is no longer available and potentially EOL. Not recommended for new designs.
I think there is another order coming in soon at Digikey. In terms comparison with the BME680, the above chart should make you worry.
Overall
Pros
- By far the easiest part to integrate. There are tons of open source libraries to use including the code I wrote for the Air Quality Wing.
- You can update the device via an I2C boot loader.
- AMS is a great sensor company. I know they make awesome products. Lots of other companies have trusted with what AMS has built here.
- Has a higher operation voltage range (1.8 - 3.3V)
Cons
- No stock. And if there is stock, it goes poof, fast.
- The jury is still out on how accurate it is. I’ve seen very wild C02 readings but also TVOC readings that don’t match up with the other sensors tested here.
My rating?
Zero stars
SGP30
Features
The SGP30 is not too dissimilar from the CCS811. It provides both TVOC and C02 readings.
The SGP30 is most limited by its operating voltage range 1.68 and 1.98V. This requires a separate power supply and level shifting bits to integrate.
Adding insult to injury, it consumes almost double as much current as the CCS811. 😬
Unlike the CCS811 they do provide an accuracy spec of 15%. Do what you want with that number.
Cost/Availability
The cost for this part is just about the same compared to the CCS811.
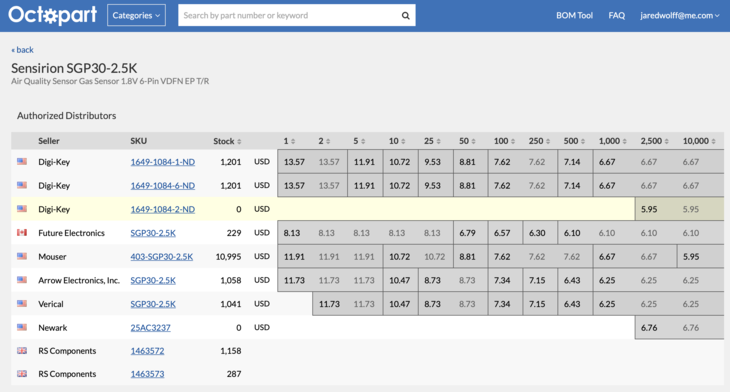
Yea, there’s tons more stock! (When you get more than 100 pieces they all equalize to about the same value.)
Overall
Pros
- From a firmware perspective it’s almost as easy as the CCS811.
- From the test data, this chip is way more sensitive than the CCS811. If you’re in an environment where you need to know this is the one to pick.
- This device is widely available though many channels.
Cons
- Requires extra hardware to run this device. You’ll need a regulator and some level shifting which will add another $0.5 in small volumes.
- Requires extra floating point operations to get the absolute humidity. (for the humidity compensation) This is not the end of the world but if you have a process without an FPU you could run into trouble.
- Calculating the Maxim CRC8 makes it a bit troublesome if you don’t have your head wrapped around it.
Not sure yet..
- This device is more sensitive than the CCS811. I can’t tell if that’s a good thing or bad thing at this point with the limited testing I’ve done.
- This device is not power optimized. Sensirion has a power optimized part called the SGPC3-2.5K (untested)
My rating?
⭐️⭐️⭐️
Testing
To get the best testing results, I used some breakout boards with all the individual sensors. I then assembled them on to a larger breadboard compared to my first tutorial..

I created a branch on the firmware repository called tvoc_test. It’s all open source and you can get it here.
Results
TVOC

In this chart you can see that the sensors mostly correlated with each other. The BME680 and SGP30 appeared to correlate the most. The SGP30 is the most sensitive.
Humidity
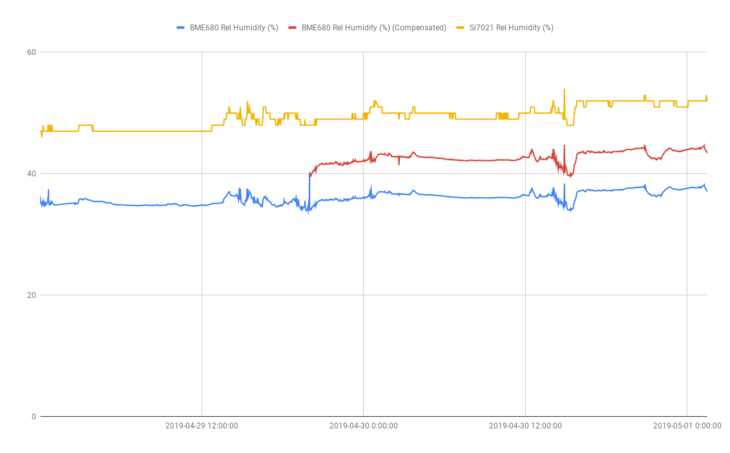
Here are all the possible humidity readings from my setup. The one that was closest to real room conditions was the Si7021. Even with the compensated values, the BME680 didn’t quite come as close.
Temperature

Similarly, the Si7021 temperature was more aligned with the real room conditions. The BME680 was a bit too high.
C02
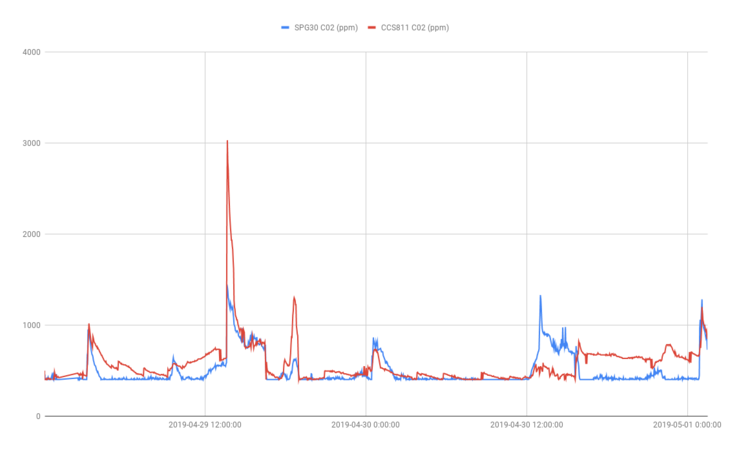
The SGP30 and CCS811 seemed to correlate well (for the most part). There’s no way in telling which was more accurate. (Having 3 sensors would help move things toward a consensus)
Conclusion
It’s a toss up.
All of these sensors performed well. The with the availability of the CCS811 has been disappointing. It’s hard to design any products and rely on this sensor when they’re not available.
There’s lots of advantages for choosing the BME680. If you have computing power, need for low power and multiple sensors the BME680 is your best choice.
As for something like the Air Quality Wing, I may replace it with the SGP30. There’s still more testing to do but it seems to be comparable in most cases.
Honorable Mentions
I chose these parts because you can purchase them at most of the big distributors. (Digikey, Mouser, Arrow) Plus, they’re about equal in size the technology they use are similar if not the same.
Here are some honorable mentions that didn’t make it that may be worth looking into:
There are other options out there. IDT has a sensor but they’re a bit close-to-the-chest about sharing their code. May be next time?
For similar reasons, here are some other sensors that didn’t make it due to their form factor and ability to source. (at least from the USA)
Special Thanks
FotoFeiber on my sensors forum. We’ve been going back and forth about what sensors are the best and why. FotoFeiber was part of the inspiration for this post. So thank you! :)
If you haven’t already, check out my post on how to create your own homemade air quality sensor. There’s hardware and code to get you started in the right direction.
Source
All the drivers and source for this project can be found on the tvoc_test branch. You can go here to get it.
Last Modified: 2020.4.26