In a previous tutorial, you learned how to add Bluetooth to a Particle Xenon application. That way you could control the onboard RGB LED from a test app like nRF Connect or Light Blue Explorer.
In this post, we’re going to take it one step further. We’re going to develop a Swift app to control a Particle Mesh RGB led. If all goes well, you should have a working app in about 20 minutes!
Let’s get started.
Don’t have time right now to read the full article?
Download the PDF version here.
Getting set up
- Install Xcode. You can download it from the App store here.
- You’ll also need an Apple login. I use my iCloud email. You can create a new account within Xcode if you don’t have one yet.
- Install the RGB example code on a Particle Mesh board.
Create the project
Once everything is installed, let’s get to the fun stuff!
Open Xcode and go to File → New Project.
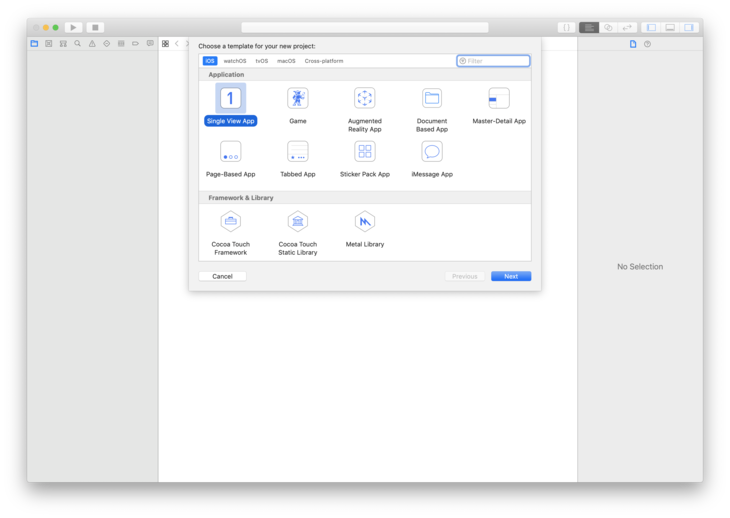
Select Single View App.
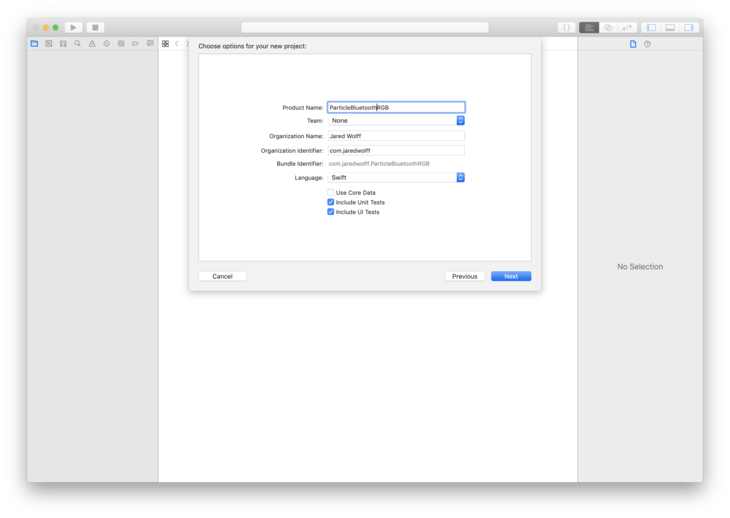
Then update the Project Name to be to your liking. I’ve also changed my organization identifier to com.jaredwolff. Modify it as you see fit!
Select a location to save it.
Next find your Info.plist.
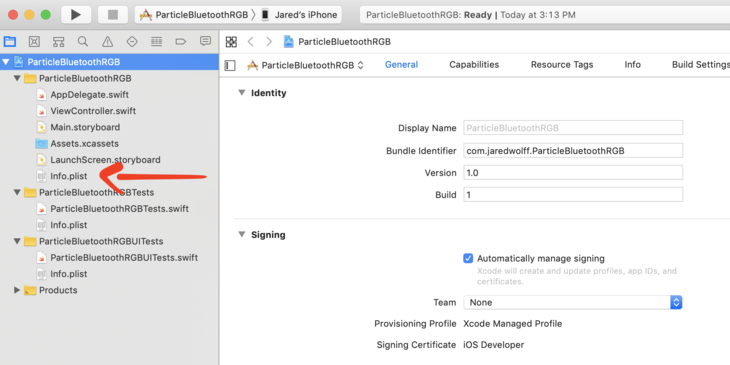
Update info.plist by adding Privacy - Bluetooth Peripheral Usage Description
The description I ended up using was App uses Bluetooth to connect to the Particle Xenon RGB Example
This allows you to use Bluetooth in your app if you ever want to release it.
Now, let’s get everything minimally functional!
Minimally functional
Next, we’ll get a minimally functional app to connect and do a services discovery. Most of the action will happen in the ViewController.swift.
Lets first import CoreBluetooth
import CoreBluetooth
This allows us to control the Bluetooth Low Energy functionality in iOS. Then let’s add both the CBPeripheralDelegate and CBCentralManagerDelegate to the ViewController class.
class ViewController: UIViewController, CBPeripheralDelegate, CBCentralManagerDelegate {
Let’s now create local private variables to store the actual central manager and peripheral. We’ll set them up further momentarily.
// Properties
private var centralManager: CBCentralManager!
private var peripheral: CBPeripheral!
In your viewDidLoad function, let’s init the centralManager
centralManager = CBCentralManager(delegate: self, queue: nil)
Setting delegate: self is important. Otherwise the central state never changes on startup.
Before we get further, let’s create a separate file and call it ParticlePeripheral.swift. It can be placed anywhere but I placed it in a separate ‘group’ called Models for later.
Inside we’ll create some public variables which contain the UUIDs for our Particle Board. They should look familiar!
import UIKit
import CoreBluetooth

class ParticlePeripheral: NSObject {

    /// Particle LED services and charcteristics Identifiers

    public static let particleLEDServiceUUID     = CBUUID.init(string: "b4250400-fb4b-4746-b2b0-93f0e61122c6")
    public static let redLEDCharacteristicUUID   = CBUUID.init(string: "b4250401-fb4b-4746-b2b0-93f0e61122c6")
    public static let greenLEDCharacteristicUUID = CBUUID.init(string: "b4250402-fb4b-4746-b2b0-93f0e61122c6")
    public static let blueLEDCharacteristicUUID  = CBUUID.init(string: "b4250403-fb4b-4746-b2b0-93f0e61122c6")

}
Back in ViewController.swift let’s piece together the Bluetooth bits.
Bluetooth bits
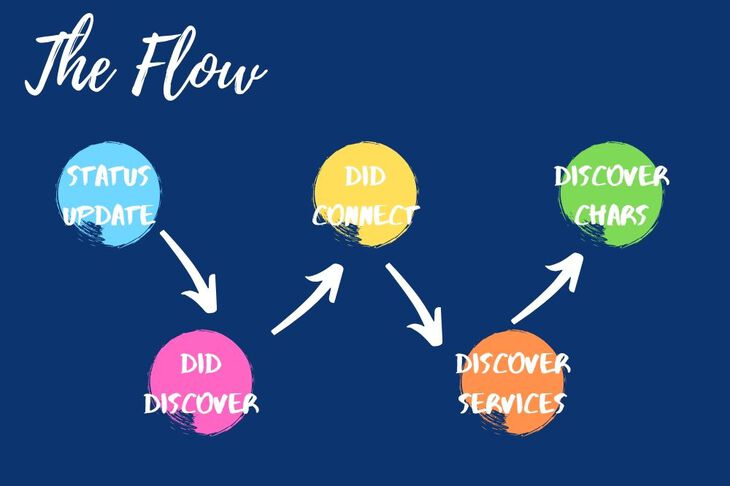
Everything to do with Bluetooth is event based. We’ll be defining several functions that handle these events. Here are the important ones:
centralManagerDidUpdateState updates when the Bluetooth Peripheral is switched on or off. It will fire when an app first starts so you know the state of Bluetooth. We also start scanning here.
The centralManager didDiscover event occurs when you receive scan results. We’ll use this to start a connection.
The centralManager didConnect event fires once the device is connected. We’ll start the device discovery here. Note: Device discovery is the way we determine what services and characteristics are available. This is a good way to confirm what type of device we’re connected to.
The peripheral didDiscoverServices event first once all the services have been discovered. Notice that we’ve switched from centralManager to peripheral now that we’re connected. We’ll start the characteristic discovery here. We’ll be using the RGB service UUID as the target.
The peripheral didDiscoverCharacteristicsFor event will provide all the characteristics using the provided service UUID. This is the last step in the chain of doing a full device discovery. It’s hairy but it only has to be done once during the connection phase!
Defining all the Bluetooth functions.
Now that we know what the functions events that get triggered. We’ll define them in the logical order that they happen during a connection cycle.
First, we’ll define centralManagerDidUpdateState to start scanning for a device with our Particle RGB LED Service. If Bluetooth is not enabled, it will not do anything.
// If we're powered on, start scanning
func centralManagerDidUpdateState(_ central: CBCentralManager) {
    print("Central state update")
    if central.state != .poweredOn {
        print("Central is not powered on")
    } else {
        print("Central scanning for", ParticlePeripheral.particleLEDServiceUUID);
        centralManager.scanForPeripherals(
        withServices: [ParticlePeripheral.particleLEDServiceUUID],
        options: [CBCentralManagerScanOptionAllowDuplicatesKey : true])
    }
}
Defining the centralManager didDiscover is our next step in the process. We know we’ve found a device if this event has occurred.
// Handles the result of the scan
func centralManager(_ central: CBCentralManager, didDiscover peripheral: CBPeripheral, advertisementData: [String : Any], rssi RSSI: NSNumber) {

    // We've found it so stop scan
    self.centralManager.stopScan()

    // Copy the peripheral instance
    self.peripheral = peripheral
    self.peripheral.delegate = self

    // Connect!
    self.centralManager.connect(self.peripheral, options: nil)

}
So, we stop scanning using self.centralManager.stopScan(). We set the peripheral so it persists through the app. Then we connect to that device using self.centralManager.connect
Once connected, we need to double check if we’re working with the right device.
// The handler if we do connect succesfully
func centralManager(_ central: CBCentralManager, didConnect peripheral: CBPeripheral) {
    if peripheral == self.peripheral {
        print("Connected to your Particle Board")
        peripheral.discoverServices([ParticlePeripheral.particleLEDServiceUUID])
    }
}
By comparing the two peripherals we’ll know its the device we found earlier. We’ll kick off a services discovery using peripheral.discoverService. We can use ParticlePeripheral.particleLEDServiceUUID as a parameter. That way we don’t pick up any services we don’t care about.
Once we finish the discovering services, we’ll get a didDiscoverServices event. We iterate through all the “available” services. (Though there will only be one!)
// Handles discovery event
func peripheral(_ peripheral: CBPeripheral, didDiscoverServices error: Error?) {
    if let services = peripheral.services {
        for service in services {
            if service.uuid == ParticlePeripheral.particleLEDServiceUUID {
                print("LED service found")
                //Now kick off discovery of characteristics
                peripheral.discoverCharacteristics(
                    [ParticlePeripheral.redLEDCharacteristicUUID,
                     ParticlePeripheral.greenLEDCharacteristicUUID,
                     ParticlePeripheral.blueLEDCharacteristicUUID],
                     for: service)
                return
            }
        }
    }
}
By this point this is the third time we’re checking to make sure we have the correct service. This becomes more handy later when there are many characteristics and many services.
We call peripheral.discoverCharacteristics with an array of UUIDs for the characteristics we’re looking for. They’re all the UUIDs that we defined in ParticlePeripheral.swift.
Finally, we handle the didDiscoverCharacteriscsFor event. We iterate through all the available characteristics. As we iterate we compare with the ones we’re looking for.
// Handling discovery of characteristics
func peripheral(_ peripheral: CBPeripheral, didDiscoverCharacteristicsFor service: CBService, error: Error?) {
    if let characteristics = service.characteristics {
        for characteristic in characteristics {
            if characteristic.uuid == ParticlePeripheral.redLEDCharacteristicUUID {
                print("Red LED characteristic found")
            } else if characteristic.uuid == ParticlePeripheral.greenLEDCharacteristicUUID {
                print("Green LED characteristic found")
            } else if characteristic.uuid == ParticlePeripheral.blueLEDCharacteristicUUID {
                print("Blue LED characteristic found");
            }
        }
    }
}
At this point we’re ready to do a full device discovery of our Particle Mesh device. In the next section we’ll test what we have to make sure things are working ok.
Testing our minimal example
Before we get started, if you run into trouble I’ve put some troubleshooting steps in the footnotes.
To test, you’ll have to have an iPhone with Bluetooth Low Energy. Most modern iPhones have it. The last iPhone not to have it I believe was either the iPhone 4 or 3Gs. (so you’re likely good)
First, plug it into your computer.
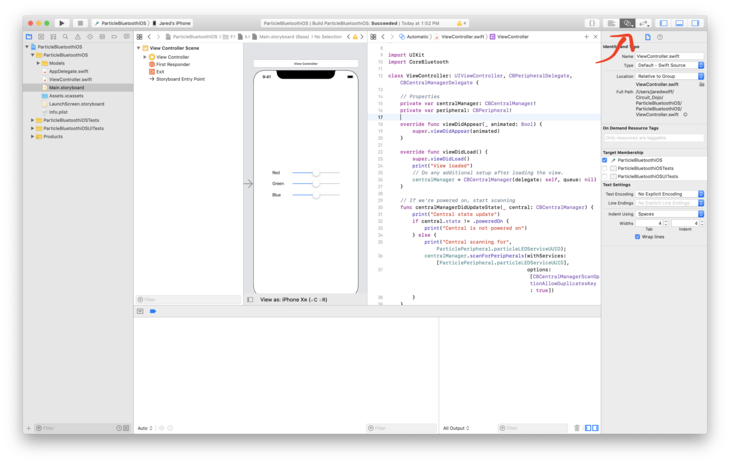
Go to the top by the play and stop buttons. Select your target device. In my case I chose my phone (Jared’s iPhone). You can also use an iPad.
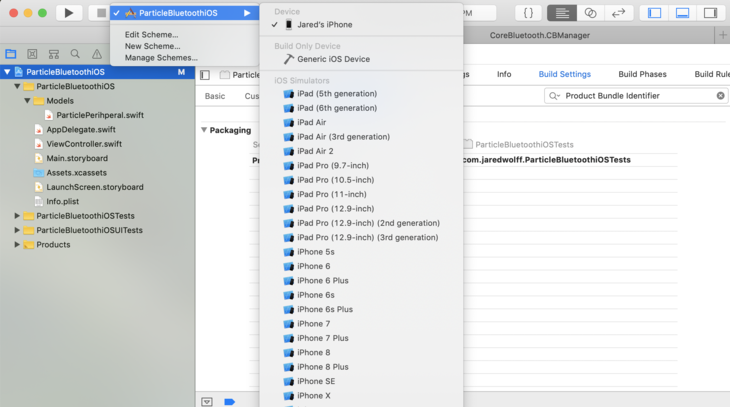
Then you can hit Command + R or hit that Play button to load the app to your phone.
Make sure you have your log tab open. Enable it by clicking the bottom pane button in the top right corner.
Make sure you have a mesh device setup and running the example code. You can go to this post to get it. Remember your Particle Mesh board needs to be running device OS 1.3.0 or greater for Bluetooth to work!
Once both the firmware and app is loaded, let’s check the log output.
It should look something like this:
View loaded
Central state update
Central scanning for B4250400-FB4B-4746-B2B0-93F0E61122C6
Connected to your Particle Board
LED service found
Red LED characteristic found
Green LED characteristic found
Blue LED characteristic found
This means that your Phone has connected, found the LED service! The characteristics also being discovered is important here. Without those we wouldn’t be able to send data to the mesh device.
Next step is to create some sliders so we can update the RGB values on the fly.
Slide to the left. Slide to the right.
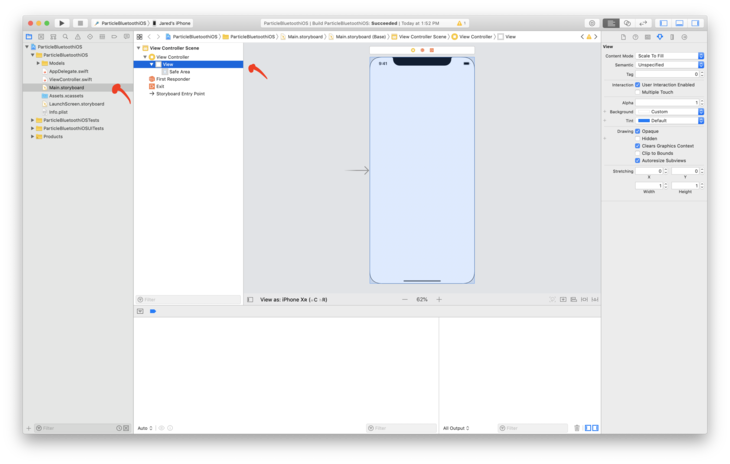
Next we’re going to add some elements to our Main.storyboard. Open Main.storyboard and click on the View underneath View Controller.
Then click on the Library button. (It looks like the old art Apple used for the home button)
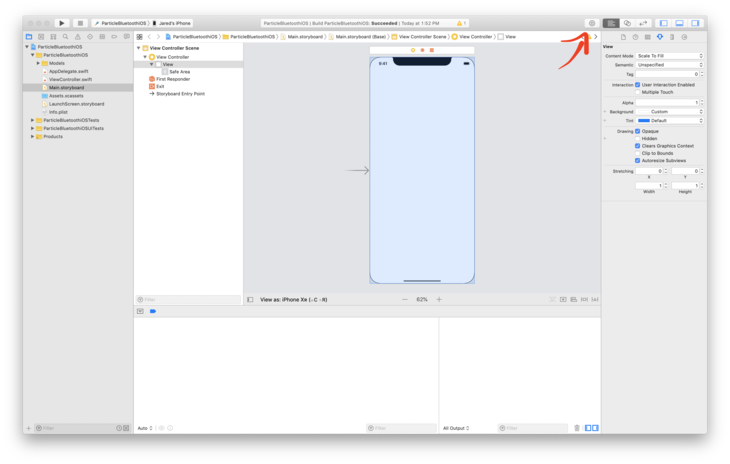
You’ll get a pop-up with all the choices that you can insert into your app.
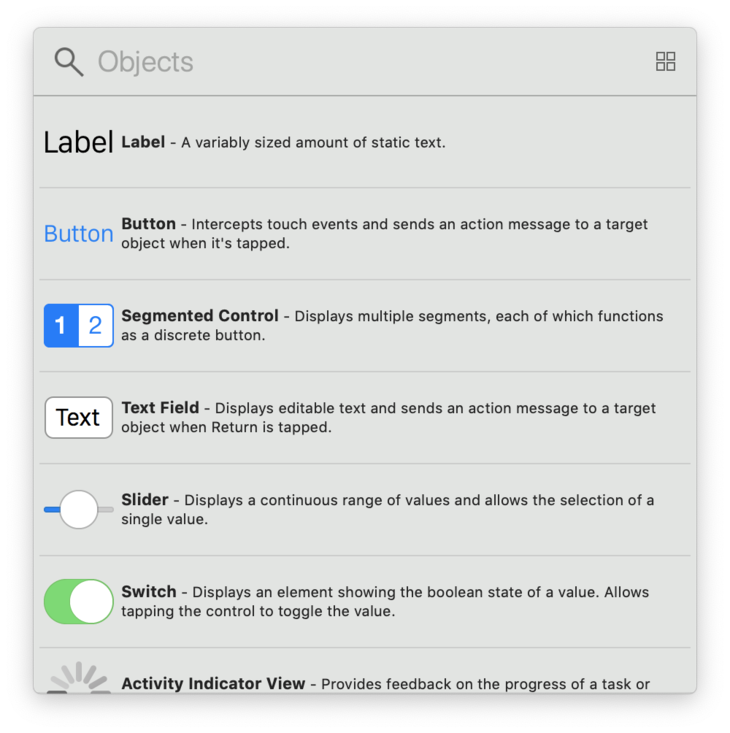
Drag three Labels and copy three Sliders to your view.
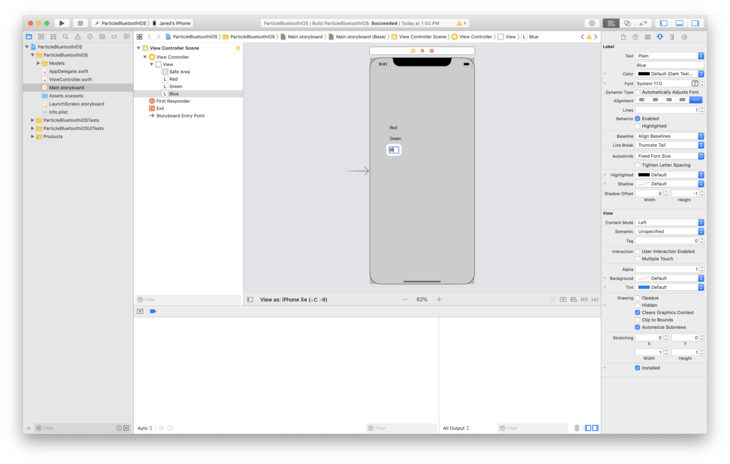
You can double click on the labels and rename them as you go.
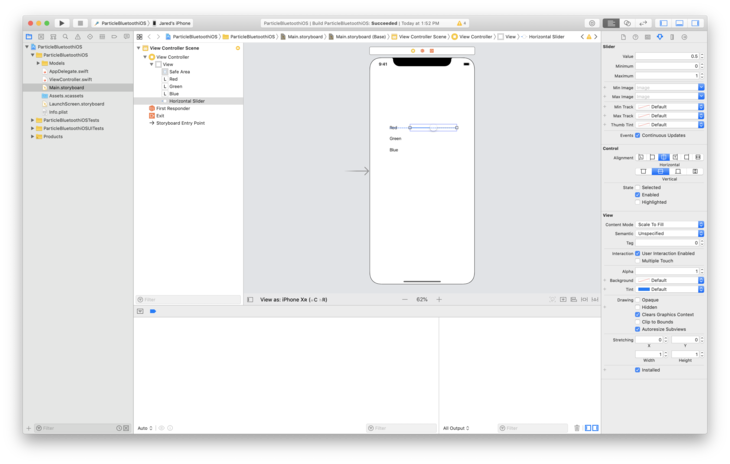
If you click and hold, some handy alignment tools will popup. They’ll even snap to center!
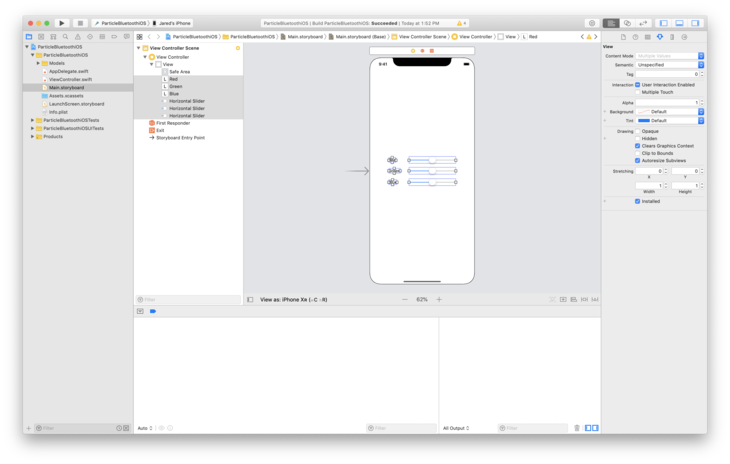
You can also select them all and move them together. We’ll align them vertically and horizontally.
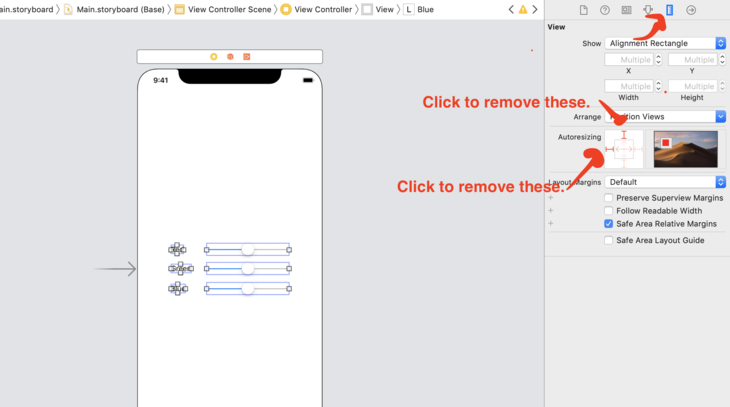
In order for them to stay in the middle, let’s remove the autoresizing property. Click the Ruler icon on the top right. Then click each of the red bars. This will ensure that your labels and sliders stay on the screen!
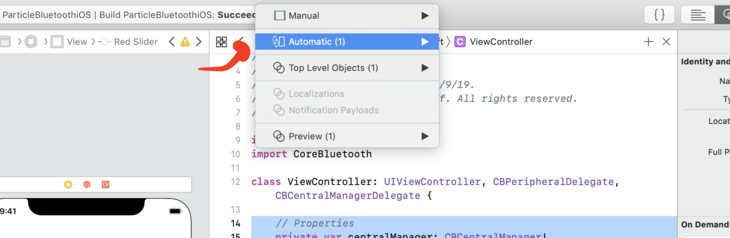
Next let’s click the Show Assistant Editor button. (Looks like a Venn diagram)
Note: make sure that ViewController.swift is open in your Assistant Editor.
Then underneath the /properties section, Control-click and drag the Red Slider into your code.
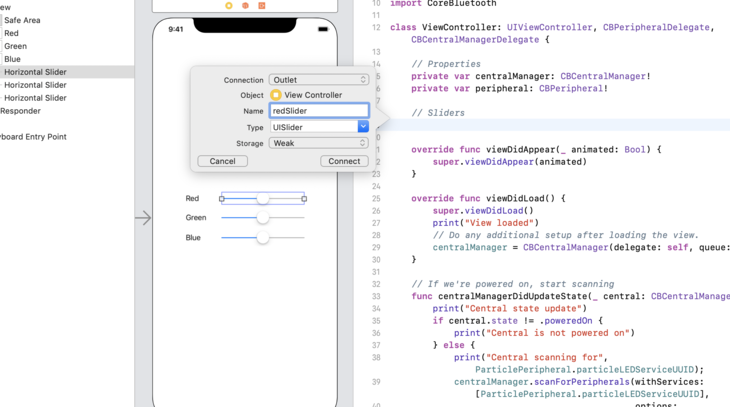
Repeat with all the other ones. Make sure you name them something different. Your code should look like this when you’re done:
// Properties
private var centralManager: CBCentralManager!
private var peripheral: CBPeripheral!

// Sliders
@IBOutlet weak var redSlider: UISlider!
@IBOutlet weak var greenSlider: UISlider!
@IBOutlet weak var blueSlider: UISlider!
This allow us to access the value of the sliders.
Next, let’s attach the Value Changed event to each of the sliders. Right click on the Red Slider in the folder view.
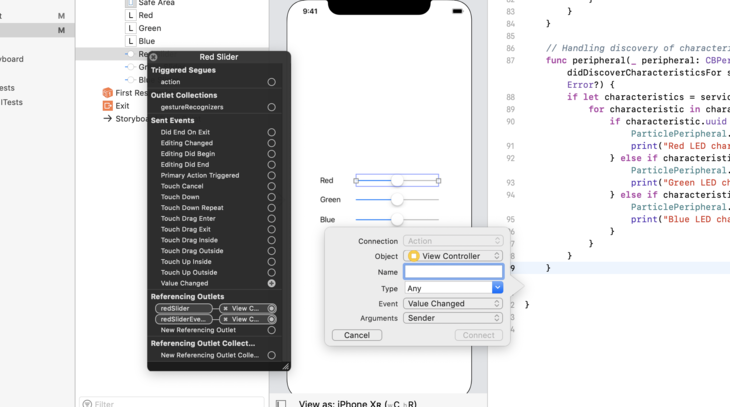
It should give you some options for events. Click and drag the Value Changed event to your code. Make sure you name it something that makes sense. I used RedSliderChanged for the Red Slider.
Repeat two more times. Your code should look like this at the end of this step:
@IBAction func RedSliderChanged(_ sender: Any) {
}

@IBAction func GreenSliderChanged(_ sender: Any) {
}

@IBAction func BlueSliderChanged(_ sender: Any) {
}
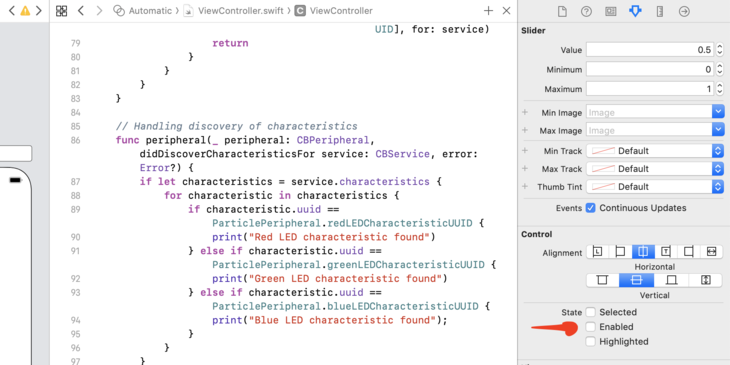
I’ve also selected each of the sliders to and un-checked Enabled. That way you can’t move them. We’ll enable them later on in code.
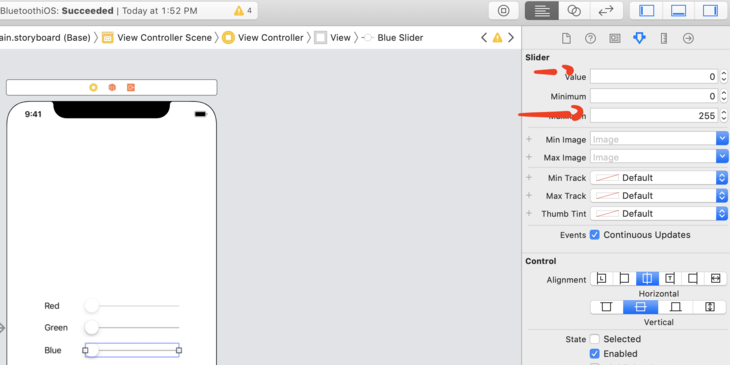
Also, this is a great time to change the maximum value to 255. Also set the default value from 0.5 to 0.
Back at the top of the file. Let’s create some local variables for each of the characteristics. We’ll use these so we can write the slider variables to the Particle Mesh board.
// Characteristics
private var redChar: CBCharacteristic?
private var greenChar: CBCharacteristic?
private var blueChar: CBCharacteristic?
Now, let’s tie everything together!
In the didDiscoverCharacteristicsFor callback function. Let’s assign those characteristics. For example
if characteristic.uuid == ParticlePeripheral.redLEDCharacteristicUUID {
    print("Red LED characteristic found")
    redChar = characteristic
As we find each characteristic, we can also enable each of the sliders in the same spot.
// Unmask red slider
redSlider.isEnabled = true
In the end your didDiscoverCharacteristicsFor should look like:
// Handling discovery of characteristics
func peripheral(_ peripheral: CBPeripheral, didDiscoverCharacteristicsFor service: CBService, error: Error?) {
    if let characteristics = service.characteristics {
        for characteristic in characteristics {
            if characteristic.uuid == ParticlePeripheral.redLEDCharacteristicUUID {
                print("Red LED characteristic found")

                redChar = characteristic
                redSlider.isEnabled = true
            } else if characteristic.uuid == ParticlePeripheral.greenLEDCharacteristicUUID {
                print("Green LED characteristic found")

                greenChar = characteristic
                greenSlider.isEnabled = true
            } else if characteristic.uuid == ParticlePeripheral.blueLEDCharacteristicUUID {
                print("Blue LED characteristic found");

                blueChar = characteristic
                blueSlider.isEnabled = true
            }
        }
    }
}
Now, let’s update the RedSliderChanged GreenSliderChanged and BlueSliderChanged functions. What we want to do here is update the characteristic associated with the Changed function. I created a separate function called writeLEDValueToChar. We’ll pass in the characteristic and the data.
private func writeLEDValueToChar( withCharacteristic characteristic: CBCharacteristic, withValue value: Data) {

    // Check if it has the write property
    if characteristic.properties.contains(.writeWithoutResponse) && peripheral != nil {

        peripheral.writeValue(value, for: characteristic, type: .withoutResponse)

    }

}
Now add a call to writeLEDValueToChar to each of the Changed functions. You will have to cast the value to a Uint8. (The Particle Mesh device expects an unsigned 8-bit number.)
@IBAction func RedSliderChanged(_ sender: Any) {
    print("red:",redSlider.value);
    let slider:UInt8 = UInt8(redSlider.value)
    writeLEDValueToChar( withCharacteristic: redChar!, withValue: Data([slider]))

}
Repeat this for GreenSliderChanged and BlueSliderChanged. Make sure you changed red to green and blue for each!
Finally, to keep things clean, i’ve also added a function that handles Bluetooth disconnects.
func centralManager(_ central: CBCentralManager, didDisconnectPeripheral peripheral: CBPeripheral, error: Error?) {
Inside, we should reset the state of the sliders to 0 and disable them.
if peripheral == self.peripheral {
    print("Disconnected")

    redSlider.isEnabled = false
    greenSlider.isEnabled = false
    blueSlider.isEnabled = false

    redSlider.value = 0
    greenSlider.value = 0
    blueSlider.value = 0
It’s a good idea to reset self.peripheral to nil that way we’re not ever trying to write to a phantom device.
self.peripheral = nil
Finally, because we’ve disconnected, start scanning again!
// Start scanning again
print("Central scanning for", ParticlePeripheral.particleLEDServiceUUID);
centralManager.scanForPeripherals(withServices: [ParticlePeripheral.particleLEDServiceUUID],
                                  options: [CBCentralManagerScanOptionAllowDuplicatesKey : true])
}
Alright! We just about ready to test. Let’s move on to the next (and final) step.
Test the sliders.
The hard work is done. Now it’s time to play!
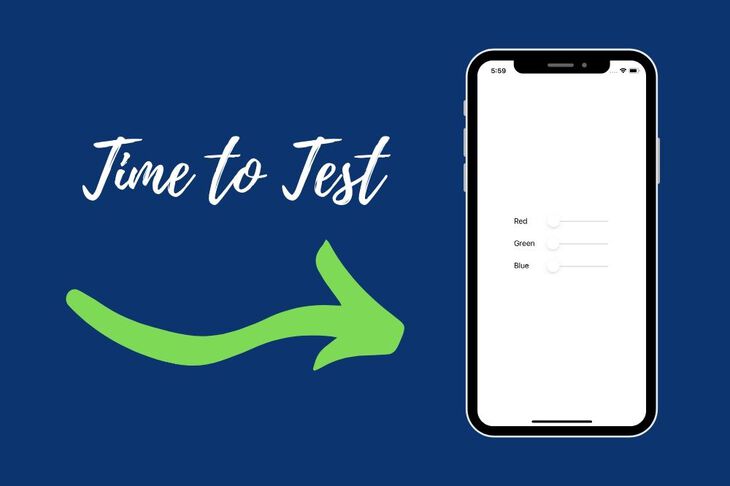
The easiest way to test everything is to click the Play button in the top left or the Command + R keyboard shortcut. Xcode will load the app to your phone. You should see a white screen proceeded by a screen with your sliders!
The sliders should stay greyed out until connected to your Particle Mesh board. You can check your log output if the connection has been established.
View loaded
Central state update
Central scanning for B4250400-FB4B-4746-B2B0-93F0E61122C6
Connected to your Particle Board
LED service found
Red LED characteristic found
Green LED characteristic found
Blue LED characteristic found
(Look familiar? We’re connected!)
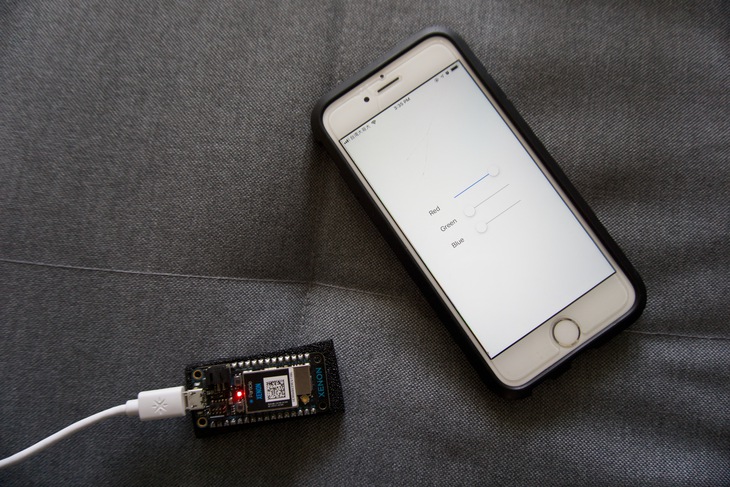
If you followed everything perfectly, you should be able to move the sliders. Better yet, the RGB LED on the Particle Mesh board should change color.
Adding Battery Level Measurements
So far we’ve learned about how to write to characteristics from iOS. Now, we’re going to learn how to read from a device.
In this portion of the tutorial, we’ll configure the Particle device to read the battery voltage. Then we’ll configure the app to read and display the results.
In the Particle firmware, let’s first add the characteristic and service UUID for the battery service:
// UUID for battery service
BleUuid batteryServiceUUID = BleUuid(0x180F);
BleUuid batteryCharUUID = BleUuid(0x2A19);
Notice how they’re shorter? These are special 16 bit UUID’s reserved by the Bluetooth SIG. Any device using these UUIDs are expected to work the same no matter what.
In this case, we’re expecting a value from 0 to 100. The number represents a percentage of how much battery life is left in the device.
Next, we’ll want to add a characteristic variable. This allows us to write to it from other functions in the code as a global variable.
// Batt char
BleCharacteristic batteryLevelCharacteristic;
Then just like before we’ll set up the service in setup():
batteryLevelCharacteristic = BleCharacteristic ("bat", BleCharacteristicProperty::NOTIFY, batteryCharUUID, batteryServiceUUID);
BLE.addCharacteristic(batteryLevelCharacteristic);
advData.appendServiceUUID(batteryServiceUUID);
It’s that simple.
The only thine remains is getting the battery level.
Let’s create a function called batteryProcess
void batteryProcess() {
}
We’ll also create a variable at the top of the file. We’ll use it as a very basic main loop timer:
// Timer for batt measurement
system_tick_t lastMeasurementMs = 0;
We use the millis() function to determine the current system timer counter. This always starts at zero and counts up. The value is in milliseconds. (if you couldn’t tell already!)
In order to implement a timer, we compare with the time now and the time since the last event.
if( millis() > (lastMeasurementMs + MEASUREMENT_INTERVAL_MS) ) {
}
You can define MEASUREMENT_INTERVAL_MS at the top of the file. I’ve set it to 10 seconds (a value of 10000). If the condition is met, then lastMeasurementMs is set to millis() and the process is restarted.
After some time millis() does overflow. (i.e. reset to zero) So before that conditional, we’ll add this one too:
if( millis() < lastMeasurementMs ) {
    lastMeasurementMs = millis();
}
Once it’s time to get the battery level, we’ll do our first measurement:
float voltage = analogRead(BATT) * 0.0011224;
This math was provided by the Particle documentation.
Next, we’ll have to convert it in a range from 0 to 100.
float normalized = (voltage-MIN_BATT_V)/(MAX_BATT_V-MIN_BATT_V) * 100;
This math normalizes the input using MIN_BATT_V and MAX_BATT_V as bounds. In this case they’ve been defined as:
#define MAX_BATT_V 4.1
#define MIN_BATT_V 3.1
Once we get a normalized value, we’ll cover the case where the normalized value goes above 100 or below 0%.
// If normalized goes above or below the min/max, set to the min/max
if( normalized > 100 ) {
  normalized = 100;
} else if( normalized < 0 ) {
  normalized = 0;
}
Finally, we’ll publish this value to the battery characteristic:
// Set the battery value
batteryLevelCharacteristic.setValue((uint8_t)normalized);
The number is between 0 and 100. We can chop off the decimal numbers by casting it to an unsigned 8 bit number.
Test Battery Level
Let’s do a quick test to see if we’re getting the battery values. The easiest way to do that is use nRF Connect or Light Blue Explorer.
Scan for devices

Connect to your Particle device.
Navigate to the battery characteristic.
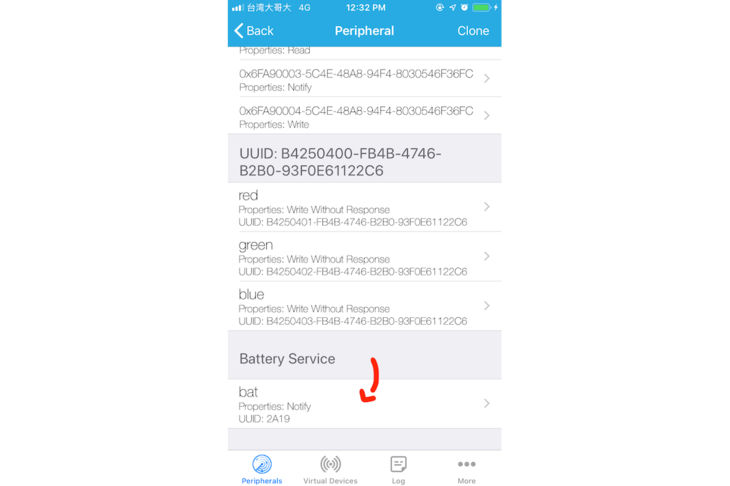
Then click on Listen for notifications
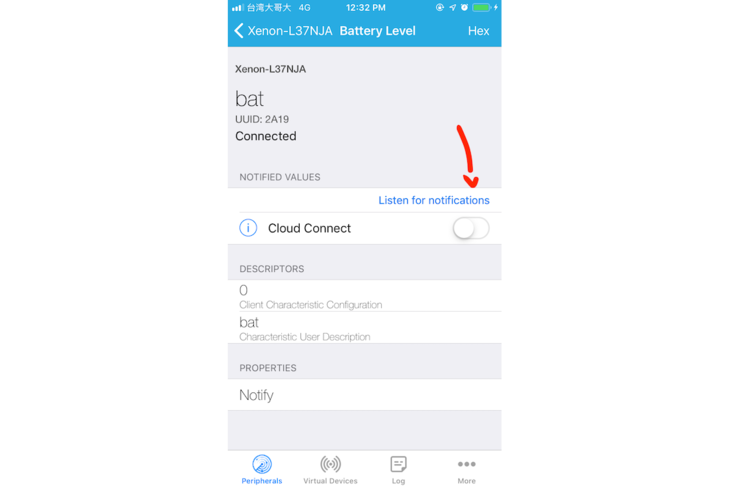
Watch for updates. Expect 0x64 (100 in decimal) as a value if a battery is not connected.
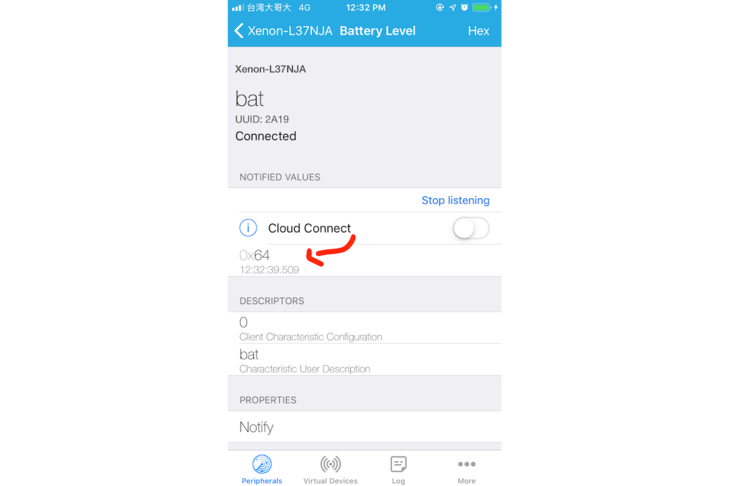
Great, it’s working. Next we’ll jump into the app side and tie everything together.
Reading Battery Value in the App
All of this is fine and good, let’s go ahead and add this functionality into the iOS app we’ve been building.
First let’s add the characteristics in ParticlePeripheral.swift
public static let batteryServiceUUID         = CBUUID.init(string: "180f")
public static let batteryCharacteristicUUID  = CBUUID.init(string: "2a19")
In the main storyboard, let’s create two labels. One with the text "Battery" while the other will have "?%". We’ll update the value of the later inside the app.
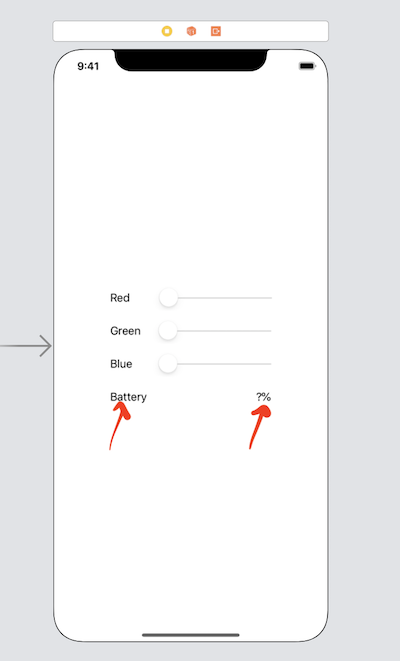
Let’s drag the percentage label to ViewController.swift. Note: you will have to align these elements properly. I’ve done the hard work in the example code. You can get it at the bottom of this post.
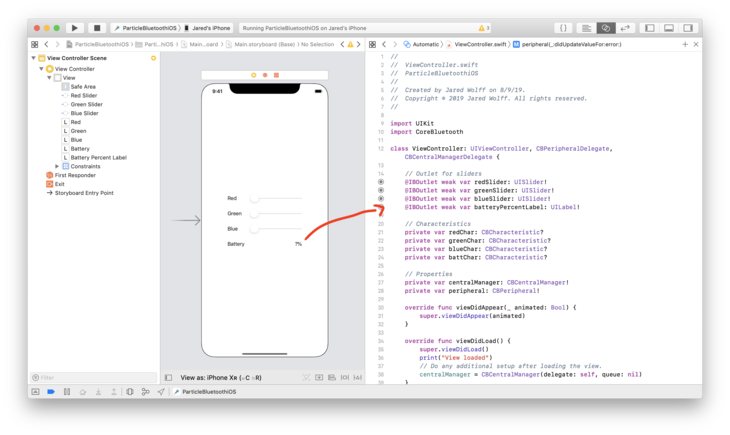
As you can see from the screenshot i’ve named that label batteryPercentageLabel. Name it as you like.
I’ve also added a new Characteristic variable called battChar. We’ll assign this during the discovery process.
In the centralManager didConnect function let’s change the discoverServices to include the battery service:
peripheral.discoverServices([ParticlePeripheral.particleLEDServiceUUID,ParticlePeripheral.batteryServiceUUID]);
In the didDiscoverServcies function we’ll add an extra conditional to see if we have the Battery Level Service:
if( service.uuid == ParticlePeripheral.batteryServiceUUID ) {
        print("Battery service found")
        peripheral.discoverCharacteristics([ParticlePeripheral.batteryCharacteristicUUID], for: service)
}
This will allow us to discover the Battery Characteristic!
In the didDiscoverCharacteristicsFor function we’ll add another conditional to check for the Battery Level Characteristic:
} else if characteristic.uuid == ParticlePeripheral.batteryCharacteristicUUID {
    print("Battery characteristic found");

    // Set the char
    battChar = characteristic

    // Subscribe to the char.
    peripheral.setNotifyValue(true, for: characteristic)
}
We’ll set battChar defined at the top of the file. We’ll also start notifications for the characteristic.
Finally, we’ll need another event handler for the notifications. This one is called didUpdateValueFor:
func peripheral(_ peripheral: CBPeripheral,
                     didUpdateValueFor characteristic: CBCharacteristic,
                     error: Error?) {
}
Inside the function, we’ll double check that the notification is for the battery level. If so, we’ll update the label text.
if( characteristic == battChar ) {
    print("Battery:", characteristic.value![0])

    batteryPercentLabel.text = "\(characteristic.value![0])%"
}
That’s it. At this point new battery updates will funnel into this function and update the text.
Test Reading Battery Value in App
Hit Command + R to load the app to your phone or iPad.
Watch the debug output to make sure all services are being discovered. Your output should look something like this
View loaded
Central state update
Central scanning for B4250400-FB4B-4746-B2B0-93F0E61122C6
Connected to your Particle Board
LED service found
Battery service found
Red LED characteristic found
Green LED characteristic found
Blue LED characteristic found
Battery characteristic found
Enabling notify  Battery Level
Then new measurement should start coming in shortly after:
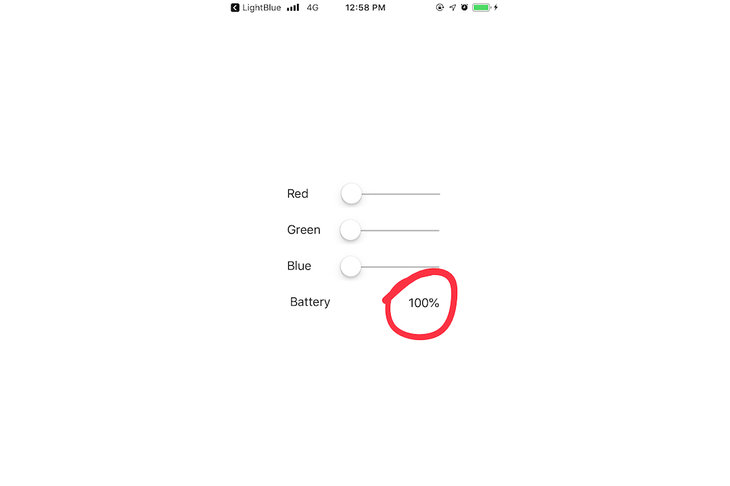
Battery: 100
Battery: 100
If you check your screen, the new percentage label should equal the same one you see in the debug console!
Conclusion
In this article you’ve learned how to connect your Particle Mesh board and iOS device over Bluetooth. We’ve learned how to connect to each of the available characteristics. Plus, on top of it all, make a clean interface to do it all in.
As you can imagine, you can go down the rabbit hole with Bluetooth on iOS. There’s more coming in my upcoming guide: The Ultimate Guide to Particle Mesh. Subscribers to my list get access to pre-launch content and a discount when it comes out! Click here to get signed up.
Troubleshooting
Things don’t always go as planned. Here are a few errors that I got during the process. I’ve also provided the solutions so you can get back to the good stuff!
Fixing “Failed to create provisioning profile”
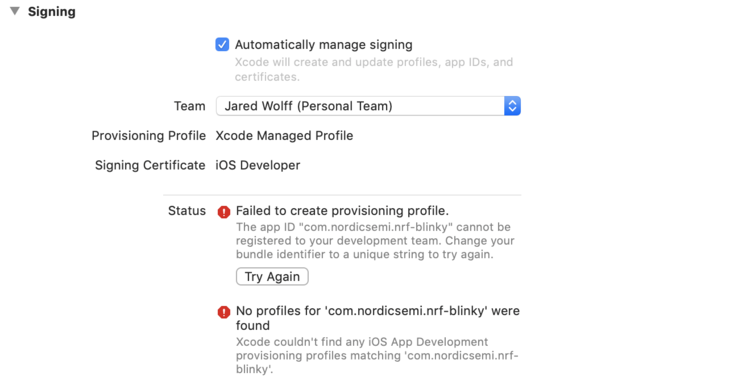
When you download the example, you may find that you get an error about the app ID. Something like “The app ID “com.name.app” cannot be registered to your development team.”
The best way to avoid this error is to modify all the Bundle Identifiers in the project.
There are three locations.
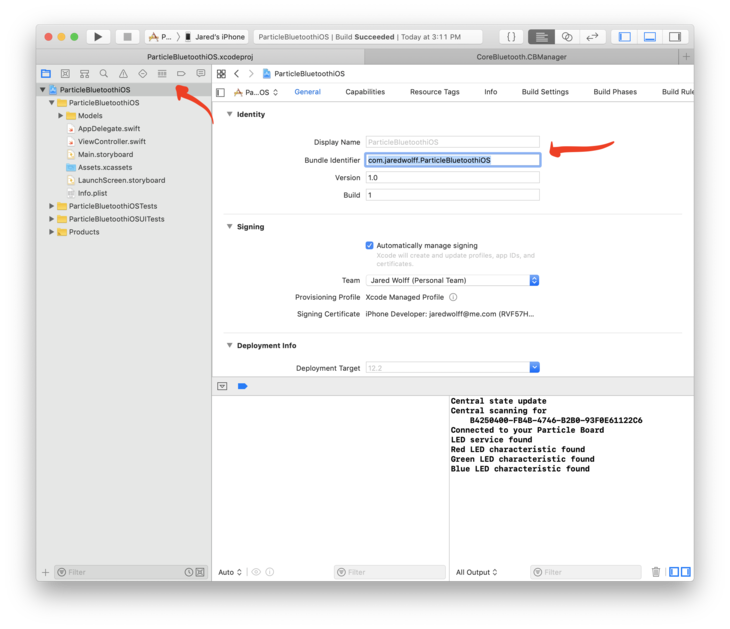
First is the main project itself. Select the project name in the left side. Then right under Display Name you’ll find Bundle Identifier.
Change my name in com.jaredwolff.ParticleBluetoothiOS to something else. i.e. com.<your name or org here>.ParticleBluetoothiOS
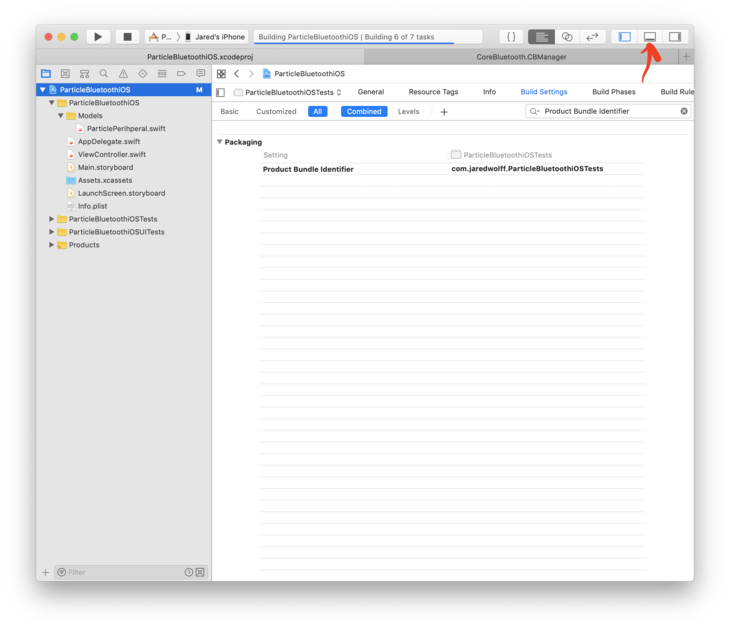
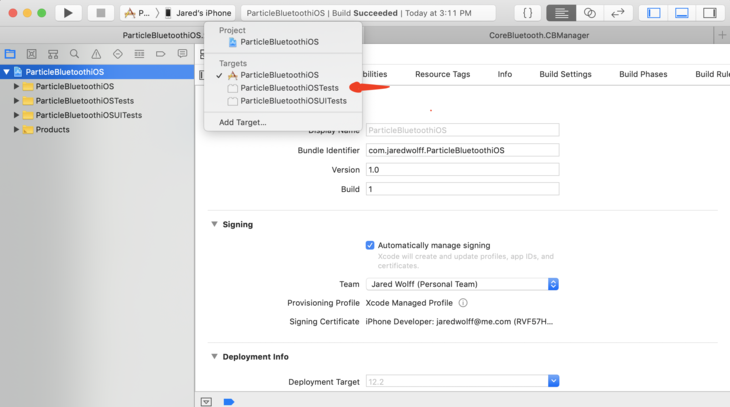
Next is in the two separate tests folders. Navigate to the first one using the drop down.
Then click over to Build Settings. Then enter Product Bundle Identifier into the search box. It will pull up the identifier for that test. Make the same modifications as suggested from above.
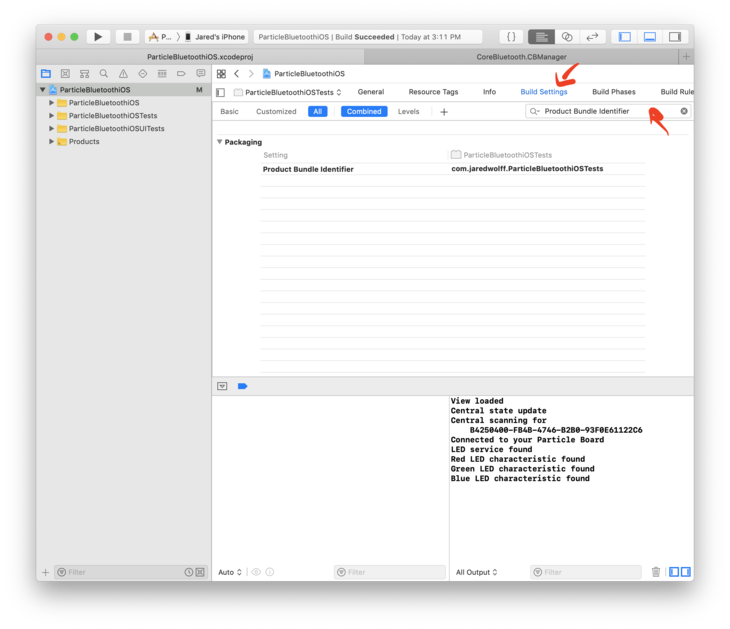
Repeat the same process for the UI tests as well. That should fix any issues you may have with downloading the app from Github.
Fixing “Unable to copy symbols from this device.”
If you get a “Unable to copy symbols from this device.” try restarting your Xcode. I’m running 10.2.1 and that’s what did it for me!
Resources
- I found that the nRF Blinky project by Nordic Semiconductor extremely useful for developing this example app.
- Also Kevin’s tutorial here was extremely handy to understand the very basics of creating a Bluetooth connection.
Thanks to both for the inspiration!
Code
The full source code is available on Github. The code for the Particle Mesh firmware is available here. If you find it useful, don’t forget to hit the star button.
Last Modified: 2020.3.7